hit s to change frame rate to 25 and to HD1080. Under black viewing box, it will say that HD 1080 is on.
start with viewer node, always there when opening Nuke for the first time.
importing footage in Nuke, create a node to read where the file is.
side icons open menus
arrow opens read, importing an image, and write when you want to export the film
rotoscoping in second menu that looks like a candy corn icon
peace sign has colour correction tools
circle with mesh icon for filters like blur
keying stuff under dropper icon
right clicking grey area will bring up same menus without icons. Can also use shortcut keys like R for read.
can also press tab and then type in what you're looking for.
read node then single click way to where things are kept.
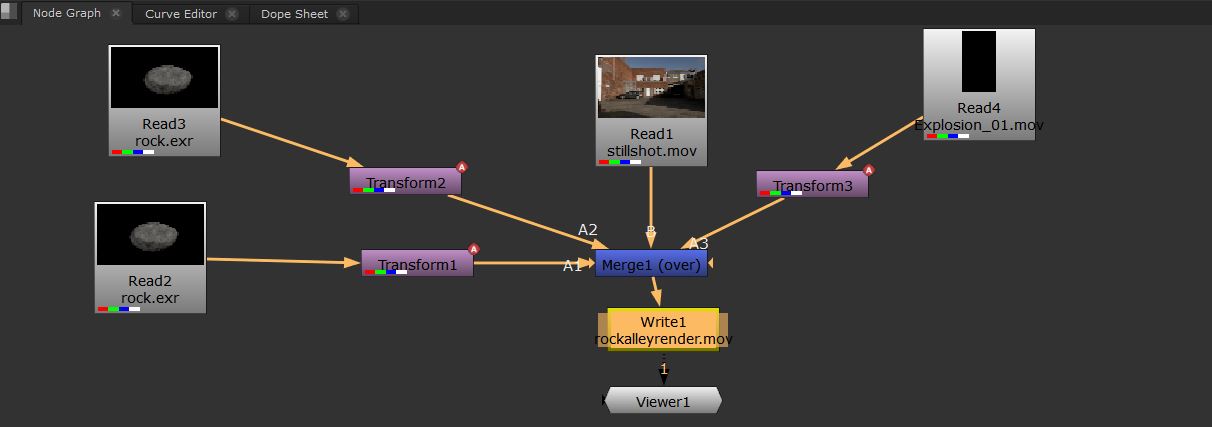
Nodes read downwards.
files will show up when node tree gets hooked up.
second file connection means both get numbered which you can switch between by hitting their numbers on the keyboard
If you want rock on top of the footage, you need to insert
insert blur node by selecting shot and then clicking on blur. Can use all the ways of looking up nodes and the connection will be made.
select node to have it's menu on right side come out on top. tiny orangey slider next to "size" changes blur on the picture.
on frame one, with slider at zero, right click harry potter scar icon to right and set key frame in blue.
practice and play with Nuke to see what you can get
next to node graph and curve editor is dope sheet. Key frames show up here and can be moved around.
to see rock, create node- M is shortcut and merges multiple elements together

rifle site shows up which can be pulled to resize the rock
when exporting, bring in a write node and place it just above viewer. Nodes are always read from top down.
reformat node when a clip doesn't fit the size of the composition
select the offending click, tab and type reformat, select that and it will pop in and sort out the size of the off clip

roto node: bring it in and let it sit for a bit. sub icons will pop in at left hand menus. choose spline? to click around item you want masked off. when mask is completed, Ben will disapper and lamp remains. go to bezier1 layer under roto root and hover over orangey box until it says not inverted. select it to invert and Ben will reappear.
color correct node goes between keylight and merge so only green screen layer is affected. Lots more options for correction than in AE.

No comments:
Post a Comment