
Tuesday, October 31, 2017
BSA324, editing and compositing, 25 October, 2017
Much excitement here! Things can be rendered as their own separate layer through Maya which means that each layer can be altered as needed. Rachel is teaching me how to do this today.
After everything in scene is finished, everything in the warehouse except the signpost and the lanterns (light source) go into their own group called "bk".
Open Render set up window (clapper board with blue paper stack icon)
 Create a layer, then a collection, which holds the first element you want rendered separately. In my case, this is all the background stuff in the warehouse. Second layer holds the signpost. We tried a test render but it turns out that all of those lights I'd put into the warehouse, and there weren't that many, were actually doing something and now I'm getting a black scene for my sign. lol. The arnold light Rachel dropped in was unresponsive so I'll put in a new Maya light and test it out. I am very excited about what happens next. Previously, we test rendered four of the frames at the end of the scene. The background, sign, and master layer all were rendered separately which meant lighting and glow on the lanterns could be treated separately from the signpost and the master layer could go over top and be tinted and otherwise manipulated to create a different look again. Love it! Very excited about this new development!
After everything in scene is finished, everything in the warehouse except the signpost and the lanterns (light source) go into their own group called "bk".
Open Render set up window (clapper board with blue paper stack icon)

BSA324, VICTORY IS IMMINENT! 30 October, 2017
Days and Days of rendering on multiple machines, the render farm, my computer while I was doing installation stuff- has finally completely borne fruit: All three layers have come through with all 1-225 frames. Now I have to try to adjust them in After Effects so they don't look like garbage. Whoo whee! The window displays are done except for portraits of Liv and Libby and maybe some sort of explanation that the show is in progress? I think some sort of signage is still missing. In spite of my misgivings, people are liking the beanbag. That is definitely going to be a work in progress: the spot fur is too long in comparison with the purple. I will have to buy short fur to replace it. It would also help if I could properly put it in rather than have it sticking out on top. The priority until 5 today is getting together a music reel for the tv downstairs.


 I've replaced the footage that I've rendered with the test pieces that Rachel set the levels on. And I've just noticed that one of the sign posts, the blue one at the bottom is rotating at a separate rate than the rest of the sign post. EGAD!!!! Hahahahhaha. Will have to re-render those another time. dammit! It's over 26 frames.
More pressing than that is that After Effects and premiere pro can't render the file past the 2.55 mark. After many, many failures to render I looked through the frames and found a 0kb frame in the masterlayer folder. Boooo! I forgot all about that. I've sorted it out in the folders and in the AE files.
Exhibition 4 promo video
Saturday, October 28, 2017
Friday, October 27, 2017
BSA324, rendering results, 26 October, 2017
Deadline monitor rendering: frames 1-225 opening scene
Rachel test>masterlayer frames 1-116 1-70 copied to master file in production>renders>opening folder
Rachel test>signpost1 frames 1-108 1-70 copied to master file in production>renders>opening folder

The wood texture fell off, or maybe wasn't even properly saved! from the wooden beams.11 hours of rendering on deadline slave, wasted, with the same problem coming from computers 1714 and 1715.
1714
Render farm
masterlayer frames 71-140 71-140 copied to master file in production>renders>opening folder
signpost1 71-140 71-140 copied to master file in production>renders>opening folder
bk1 71
1715
Render farm
masterlayer frames 141-225 141-225 copied to master file in production>renders>opening folder
signpost 0 frames
bk1 141
my computer 1713
D drive
masterlayer frames 1-37
signpost 1-36
bk1 1-37
 Everything is still going well on my computer but it's taking so long that it isn't worth continuing. I will save the master warehouse file to Y drive render farm again and run the deadline slave again.
Rachel test>masterlayer frames 1-116 1-70 copied to master file in production>renders>opening folder
Rachel test>signpost1 frames 1-108 1-70 copied to master file in production>renders>opening folder

The wood texture fell off, or maybe wasn't even properly saved! from the wooden beams.11 hours of rendering on deadline slave, wasted, with the same problem coming from computers 1714 and 1715.
1714
Render farm
masterlayer frames 71-140 71-140 copied to master file in production>renders>opening folder
signpost1 71-140 71-140 copied to master file in production>renders>opening folder
bk1 71
1715
Render farm
masterlayer frames 141-225 141-225 copied to master file in production>renders>opening folder
signpost 0 frames
bk1 141
my computer 1713
D drive
masterlayer frames 1-37
signpost 1-36
bk1 1-37

Wednesday, October 25, 2017
BSA324, Rendering info, 25 October, 2017

Update: Errors kept coming back as I tried to use the other computers. The message said the deadline slave couldn't open the file from render farm. I will contact IT tomorrow. In the meantime, I am rendering on three computers from Render farm overnight and that should yield some results I can look at tomorrow morning in class.
Monday, October 23, 2017
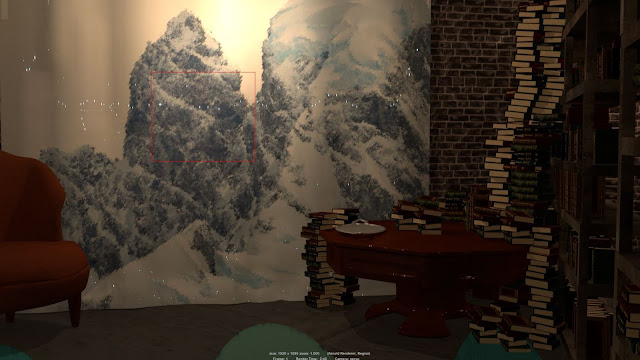
BSA324, signpost and show title, 23 October, 2017

 Inspired by local colour out at Stirling Point, Bluff, I have made up a sign post for the Imagination Warehouse. For the show titles, the top rectangle will say GIRL and the top left pointing sign will say IMAGINATION and a lower right pointing sign will say WAREHOUSE with a floating "and the" to make it clear. During the episode, the sign post might direct Girl down an aisle, or warn her off. The signs will point out how many years, or miles, until big life events like Gushy Stuff, Success, Independence, or deliver warnings like It's a Trap or Still Time to Turn Back or Better Than You Can Even Imagine.
This one has fun colours and different fonts which things up.

This has clear text and strong contrast for readability


BSA324, mixed tape drops 2018, 23 October, 2017
Inspired by this:

I did this:


BSA326, Body of Work presentation prep, 23 October, 2017
My project presentation is 1 November and the body of work/blog is due 10 November. I will focus on showing modelling, texturing, and advanced rendering techniques for the 3D model of the Imagination Warehouse and Jellybean. I will also show lighting and compositing effects that I made for the show in After Effects. I should also be able to focus on particular items in the scene (shelves, brick walls, pillows for Ncloth?, lanterns for lighting, and how they all came together. I'll use the no vox versions of some of the songs Anna recorded to score it. Prickles sock museum would be a good part of the IW to showcase because there is glass, wood, sock, and all the other stuff in there. It's a very full scene. WOWZA, really being ambitious here, maybe I can get that Prickles menacing Jellybean during the roll-up shot done. That will only require rendering one frame with one camera. I can do it!!! WHOOOOOO!
BSA324, Window display, 20-23 October, 2017
20th
I picked up the Resene paint purchase order from Rosalie. Resene only had the black and white paint I ordered. The brown they will drop off to me when it arrives via courier this afternoon. I spent another hour scraping and acetoning the window. There are still bits that won't come loose but it's time to move on.
21st
I painted the white box black and pulled up the white poster board on the floor. The carpet is red in both boxes. I will have to come up with something to cover that. I painted the mortar lines onto both boxes. Resene says that the brown paint will not arrive until Tuesday, earliest. I'm glad that we have 24 hour access. I didn't finish until nearly midnight. I will add some brown sponging on Tuesday.
22nd
In the morning I made a string of Jellybean lights! I cut/auguered holes in the backs of the glow in the dark Jellybeans and put them onto the string of lights. I've only got nine. I could live with it, but I don't think that I'll be able to stand it. I will ask Kevin tomorrow about where he got the glow filament. I'll print at least one other set. In the afternoon I went back to painting in the windows. The smaller box is definitely the neglected one. By the time I get over there, I'm totally sick of whatever I'm doing and the lines are skewy. I darkened up the leftover grout paint and put some texturing onto the bricks. It's looking like a brick wall but I wish I had that touch of brown in there. I only worked for 3-4 hours today in the windows and then went home to paint Jellybeans.
23rd
I dragged over shelves, beer crates, suitcases and some objects to decorate with. If I know what part of the brickwork is exposed, I will put the brown sponging in there. I'd like to tie the walls in with the browns and creams of the shelving. The characters will pop! The big printer is set up with matte paper and I'll print characters on that. Here's what I'd like to print:

fake book cover x1 I've already got 3 printed out with Goldie and Girl in different places that I can fake up as other copies of the book if I pile them up.

Girl on the bean bag, maybe with a big "Coming Soon!" sign over her hands.
Should I have a Jellybean-bag in the products window and a print of Jellybean with the others in the warehouse window? What if I recreate the cookies scene?

I will flip flop the layout in the window so the shelves are at the left and Jellybean is to the right. I resized everything with Jellybean being one foam core board (76.5 cm) high. Everybody else is scaled down relative to that. I printed them out on matte and will foam core them later this week.
If I make a furry Jellybean-bag for the products window, maybe I can print and foam core up a Girl to sit on the bag. In an ideal world, I'd be able to find a child-size mannequin to sit up on the bean bag wearing some Girl and the Imagination Warehouse swag.
For the rest of tonight, I will 3D model that Bluff sign I keep thinking about to use as my show logo. Maybe I can have that one say "Coming Soon 2018; Girl and the Imagination Warehouse" on the signs.
Saturday, October 21, 2017
BSA303, 100 hours complete! 21 October, 2017
21/10 Tale Enders 2 hours 25 minutes 11-1:25
14/10 Tale Enders 5 hours 15 minutes 11-5.15 with one hour for lunch
That's it for now! I will come back and do more internship hours after classes have ended. I've learned a lot doing the Tale Enders internship and I'd like more experience with Maya, cameras, shotgun, and editing.
Today I playblasted all of the cameras Rachel set up with the proper background and all bits like cameras and rigs turned off. Only the relevant frames were re-playblasted with the proper aspect ratio set up and those clips were loaded into premiere pro for rough editing. Rachel will have a look at it next week and decide if there are any gaps in the story. The next playblasts and all big files, like Maya and Premiere Pro, were loaded into shotgun. It is AMAZING how much Shotgun holds.
 |
| Screenshot of Maya set up with camera and timeline views. |
 |
| screen shot of Shotgun Scene 21 |
Wednesday, October 18, 2017
BSA324, IW decoration and texturing, 17 October, 2017

I am starting to obsessively render PARTS of the warehouse, just to check on the textures. Like the lanterns are not glowing on their own and they're not translucent enough to let a light shine through them either. But this is NOT a good use of my time. There are still aisles to decorate and things to build and doing that isn't a good use of my time, either. Because I could decorate forever and ever and never be satisfied. Some parts of the warehouse will need to be redecorated, anyway, to fit the episode. Tonight will be my last night to fix up the Warehouse, just so there aren't any blank spots as the camera moves around, then it's time to set up cameras and start to render them wandering through the warehouse.
 Another kind of box.


BSA324, Lanterns, 18 October, 2017


Rachel set up a VERY NICE lantern after her initial experiment with the texture. It's nice but not acting the way a paper lantern would.

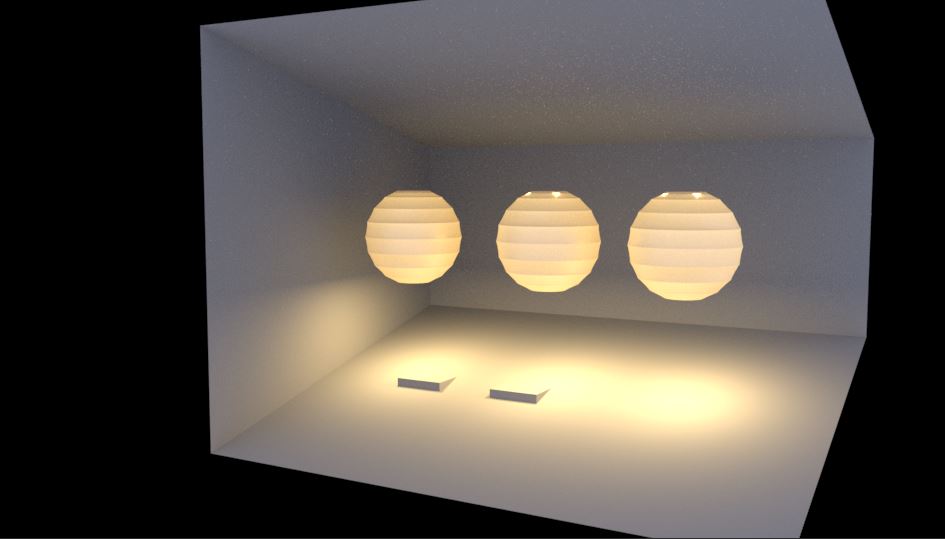
UPDATE: The lanterns work on their own. Then i import them into the bigger scene and they stop working. What gives?!? I replaced about 20 of them before I realized nothing was working. Then I stopped, tried it all again, still nothing. A mystery that will not be solved this time around. The "rubbery" lanterns are glowing beautifully and look nice. I will be satisfied with that.
Tuesday, October 17, 2017
BSA306, Final presentation, 17 October, 2017


Will I sculpt and print the other characters? Yes. I wanted to do all of them but there wasn't enough time to do that when I no longer needed 3D characters for my animation.
Will I ever do a big head Funko style of this character? Yes. I designed some "chibi" designs but decided to focus on keeping the character as it appears in the animation so anyone who gets it is clear on the design. Anybody that sees the Funko Batman knows that this is the FUNKO Batman and not Batman, full stop.
Would I ever pose the character, or would I leave it in "idle", or stationary, pose? Yes. I did experiment with putting in a quick rig but found that the weighting that would have been needed to get the pose right was going to be time-consuming and outside the bounds of requirements for my animation.
Subscribe to:
Posts (Atom)