I need two more 95.50 jellybeans, then I'll have 3 different styles of packaging and collectibles,
2 more 55.50 teenybeans for I don't know what, and 2 more gigantor Jellybeans to decorate and cover with fur. I've been painting the ones I've got this weekend and they're looking good. The nail varnish stinks forever and a day, though. Not sure how that's going to go with the candy jellybeans.
I ran out of white and changed out the filament to black. I'll need to prime it so the paint colours look like the other ones.
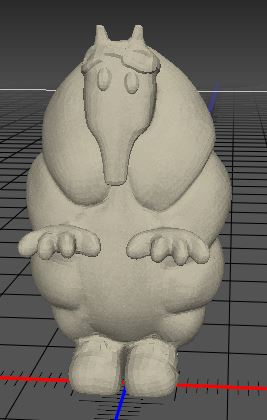
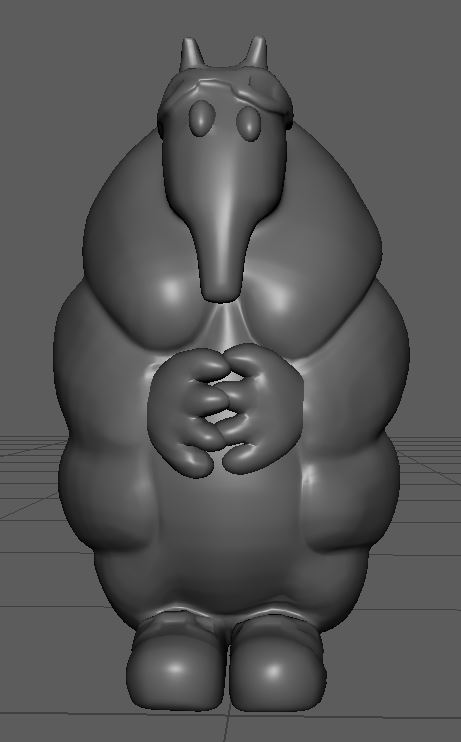
After starting on my presentation, I was able to see what I've done and what still needs to be done for the 3D printing project. Some of my ambitions, like multiple characters, have been curtailed while I've been able to try different sizes and decorating styles of Jellybean. Printing without holes is my next goal. In pursuit of that, I have printed a "teenybean", 50mm high of Jellybean in the first position (hands outstretched). Very successful! No holes anywhere. Before printing, Rachel had a look at the model in Maya and photoshop and all was well. Or photoshop fixed something.
Not sure how that's worked out. Since that model was working well, I went into print2 model and took off the hands, filled the hole, fixed the geometry and imported an print1 to steal the hands. I positioned them on the belly with fingers more closely together and Rachel ran it through all of the mesh display checks ( average, conform, reverse, set to face, vertex to normal, soften edges) then exported as an obj and an stl.
Lookin' good, lookin' happy.
Lookin' weird... this time in photoshop, the texture is all pixely and we don't know why. I took it to the makerbot software to see what would happen. I opened the obj and found lots and LOTS of holes, some I've never seen before in that program. I then opened the stl file and found no holes. Maybe the problem has always been that I've been printing objs and not stls.
YIKES. No. Photoshop really "fixed" this one and it looks like a blob of guano. I won't be exporting this. All of the detail has disappeared!
That's better. I looked back through the history and saw that Rachel had gone into 3D print settings. I put the settings to high and more detail has come back. I have exported that with repairs from photoshop as jbn_tst3.stl. After Teenybean2 finishes printing, I will print this one to compare differences. The print time is about 38 minutes so running multiple tests is easy.
Teenybean2 took 1 hour 37 minutes to print, is not the same height (even though I could swear I scaled it up to 50 mm, and has a thicker shell in some areas than others. I don't get it.
Teenybean 3 took 1 hour 51 minutes to print. WHY? And why is yet another sculpt that has been scaled up to 50mm a different size altogether from the first two? And the details on the hands have disappeared. Most perplexing. Thank God for these tiny tests.
These are screenshots of one test 4 in the makerbot software. It's helping me previsualise what the print is going to be now that I know it's showing me problems in the sculpt. I've bagged printing number 4 until I can ask Rachel why geometry is being added (between the shoes and goggles) or smoothed off (eyes and fingers). I'm doing another test print, this time of #2 and have scaled it up to 95.7mm. Between 9 and 10cm will fit into the jar downstairs. Everything looks good according to the previs, very crisp.
I stopped the print at 47% because the crotch didn't print. I started it again with 2 shells, hope that helps.
28th
The 2nd go at the larger print was successful in the crotch but the ears were terrible! That was a 6 hour 43 minute print. What gives. Rachel had a look over the file again and ran it through photoshop where it's looking good. Everything also looks crisp on Makerbot. Printing it again to join the teenybean army that's developing on the shelf next to my computer. At 90% done, I can see little holes in the sides. It may be that 2 shells has to be the permanent setting, not 1. And the speed isn't that much better by setting it at 1. Will see about those ears. As Rachel said, I may have to make ears to put onto the sculpt. I can do that with Sculpy.
Teenybean #4 has some holes that can be filled, probably just by the nail polish, and the ears look good. Printing on high quality with 2 shells as Kevin and Rachel recommend will also fix that error.
95mm print: somebody logged me off the computer and the print stopped mid-way. Sigh. The holes are gone, so the 2 shell and larger print is definitely working. I've got two Jellybean "butts" on the shelf. Turn them into egg cups? I don't know.
Success! The 95.50mm Jellybean with 2 shells on 0.10 wall height? has come out brilliantly: crotch, ears, and hands are all there and it only took 3 hours 42 minutes to do it. I've put another one on tonight.
I entered my super swanky pitch bible. I've been working on it so much that it didn't feel like I'd done any new work for the exhibition. ha!
I entered a grouping of painted 3D printed Jellybeans and some packaging ideas. This also seems like something I've been working on so much it's not new. Double ha!
Finally, I entered an updated version of the animatic. This one I can't remember what I've done to it since the last exhibition. Really, I wanted to showcase the song Anna van Riel did for me based on the lyrics I sent her. I still need to do a new sequence that fits this new opening, and I have a plan for that, but for this exhibition and assessment I put in a string of concept art I already have and took out Girl explaining the problem of the day up until the beanbag transforms into Jellybean. The first segment of the show, Prickles and Jellybean's Sock, has me doing all the voices and whistles with the help of the excellent, if basic, voice changer app I download to my phone when I need it. I spent two hours recording and 6? hours layering it into the animatic. If I could get a little ukelele strumming going on underneath the scene and some foley, it would be rough but on the way! I will get a rough opening into the animatic this weekend and then it's nothing but animating for 8 weeks.
I got some good feedback; Vy said she could tell I'd done lots of work, Kevin's dad said he liked the textures, and Anna says she wants one of the Jellybeans. ha ha! I told her we needed to do a raffle as I didn't know how many I'd be able to produce and I've already had some requests. I need to start making merchandise. Ha ha ha!
IT'S A TABLETOP VACUUFORM MACHINE! I CAN'T BELIEVE IT!
So vacuuform is how we made a lot of our armour when I worked at Utah Shakespearean Festival. This one relies on a vacuum cleaner to get the suction going through the bottom layer (you can see the tiny holes in the bottom plate where the air gets sucked through). The middle tray holds the plastic which is then warmed up with, I'm assuming, a series of lightbulbs in the top section. The plastic in the tray then gets dropped over the sculpt that sits on the suck tray (technical term) and forms a reverse mold. The makers then reckon you can pour concrete or another substance into the mold and go into business. I'm looking at this and I'm seeing all the findings, jewelry, and other assorted costumes props you can make out of it. How much is this beautiful thing, and should I wait to really want one until after they work out the bugs?
IT'S ONLY $US459!! I'll bet my mom would buy this for me if I promised to move home. lol
They're also saying you can 3D print stuff and use it as the positive to make a mold with. I could really have an army of Jellybeans going. Ha ha!
The group, except for Jellybean who is in the jar, wrapping around the outside facing into the jar to look like Jellybean is with friends. Maybe it'll look more impressive in colour because b/w isn't doing anything for me.
I did the research, but didn't spend any real time designing what I wanted the packaging to look like. It's definitely "prototype" for this exhibition. The middle name band looks very nice wrapped over the brown box. I think I would extend the band so it wrapped all the way around the box and "sealed" it. Each character, if I was doing the whole line, would have their face in the circle. Medium Jellybean went into the box with a hunk of purple fur. It was to keep the toy from rocking around in the box. In reality, shredded paper would be the better, more cost effective option.
The jar packaging, at extreme left in this photo, has a plain name band on the front, a product description sticker on the back and a group portrait of the group stuck on the inside of the jar for colour. The description sticker is really big and I don't think you can see the portrait. combined with the name badge, it does look like a unified wrap and would look very flash if I could get the size right and print it in one piece. I'll do some more work on these ideas for the final project talk. I still need to get good prints going before I do anything more on packaging. If the toy is crap, who cares what the container looks like?
Finally! I am doing something for my 3D modelling/printing research toy design project. I have been lax- even when I have admitted in class that I haven't done anything, I still go away and don't get caught up. Being reminded that we are in week 7 and our body of work is due in week 14 and we REALLY SHOULD be over 50% of the way done has helped light a fire.
I'm getting the basic in, done nicely, and will refine her in Zbrush. With that plan, I am probably being too particular with trying to get her dress fixed up in Maya but I can't help it. When I take this into Maya, I will keep the head and body separated so I can refine the collar and really get around her jaw line in Zbrush. For my third toy character, I may do Prickles. He's super easy and they're all in a scene together. Then I can pose them individually and as a group. Prickles will be mounted on a "pole" in the scene so he looks like he's swimming through the air.
I first tried to trace around the figures on the page but the filament came out super fast and started to curl around. Then I tried to build a figure by piling the squiggles on top of each other. Finally, following what Kevin was doing, I tried starting and base and building a shape up. Apart from creating free form messes, I'm not convinced of the usefulness of this product. I might give it another go, but I won't hold out for mastering it.
3D Jellybean #1 done!
He was very "facety" because I printed him lo poly with no smooth mode, and no amount of sanding was going to fix that. I did some basic painting on his head, belly, hands and feet and then covered his shell with purple fur and spots of colour. by doing this I learned that if I want to repeat this in future, in addition to the sculpt needing a smooth mode, his head, feet and hand need to be significantly bigger to keep proportion with his bulk after the fur goes on. It's a good first effort.
This is the fur I'm going to make the costume out of. Maybe a stretch velvet would have replicated the pile in miniature.
Rachel got the makerbot 3D printer running yesterday and after 9 hours and 19 minutes, Jellybean was made! The rest of the characters are 1/2 to 3/4 his size which will speed things up considerably. I will print him again in his Zbrush version.
This version will be cleaned up and painted/decorated for the exhibition.
Files should be taken out of Maya as Objs and imported into photoshop. Need to get Chris to show me again how to film what's being done with OBS or PRS or whatever that program was...
Save file in Maya as an obj.
In photoshop, open a new document- anything will do. Under 3D menu, select new 3D layer from file and import your obj file. when prompted, accept moving to 3D space.
change size of file to 10 x 10 x 10? so it will fit on 3D printer.
somehow, it has to become a .stl file to be read by the Up 3D printer program. I can't remember how to do that...
open Up program in printer room. and blah blah blah from there. Go through it again with Chris on Monday. There's a list of things that have to be set in the program and measured on the printer like pad and nozzle heat setting (cover pad with glove once everything else is done so it heats up evenly). Nozzle temperature has to be what? filament melts at 260 degrees Celsius and pad has to be 100 ish to work.
You have to test that the filament will come out of the nozzle and isn't stuck in there. You have to plug the magnetic thingie into the printer so it can calibrate where the pad is and make sure it's evenly set up. Turn the printer on from the back and initialize it from the front. Never touch the motor! Electric shock will occur.
Once printer is calibrated and set up, then you can bring in file and make sure it fits inside the invisible cube with the checkerboard floor in Up. Printer will print 13 x 13 x 13 centimeters so make sure your object is smaller than that.
This was a really good shot by shot look at how this toymaker makers the figures. He's working with wood, but I greatly appreciate the blue foam sculptures (above) as that's what we used to make in puppetry class at Uconn. If I used this for my process, I could easily coat them with a polyurethane or mod podge to seal the holes and make silicon molds.I wonder if I can get an internship with laser cutter lady on Tay St. and learn how her machines and pipeline work.
Slick on the outside, brightly coloured and blocky on the inside.
This packaging is effective because it shows it's intended recipient, a dog, using the toy. And the dog is looking at you, just like your dog will look at you, and it makes you want to buy one.
Connection between box and toy design is interesting
Box design matches the toy. I like the slide out box style.
These are super cute! The box would be just as good a toy as the finger puppet inside.
This is great. A nice little product, when it's finished, and a good box.
I like the printing inside of the packaging.
This kind of packaging is more of an event than the others.
AND David Bowie toys. Love them so much, especially the Thin White Duke, my favourite Bowie.
This is making me want to go back into costume crafts and work for Shakespearean festivals again. Maybe I learn the 3D arts, then combine it with Marvelous Designer, and then go work for movies/rich people who will pay me well for it?
This armour, in addition to the smooth 3D printing, also uses LEDs to showcase the fine scroll work. Beautiful. And extra points for abandoning the "Iron Boob" look of so much female fantasy armour. Now that I know that chiseled breasts mean introducing a sternum busting hard point to your body, I can't look at that kind of armour the same way again. This Ng uses ornamentation and design lines to create a feminine bust while still looking authentic.
Your
Way, Every Day: The Simplification of Collectible Toy Production Through 3D
Printing
In the world of toys, what if you could have what
YOU wanted instead of what you were told you SHOULD want? This is the tantalizing promise of 3D
printing to makers and consumers alike. While it may seem that we have
many choices when we go shopping, there aren't: 80% of the world's toys
are manufactured in China in vast quantities that only guess at consumer demand
and produced before what they’re promoting make it to the public sphere. (Lipson, 2013) In the new paradigm that 3D printing offers, a collector
can order and pay for a character online, a pre-existing digital file can be
modified to meet requirements, and production can take place close to the buyer. Designers are similarly offered the exciting possibility of
modification, replication, or duplication of the original without the tedious
and expensive back and forth of working with an overseas manufacturer. (Lipson, 2013)
This semester, I will undertake the development of a
children's TV show with a view to pitching the show for funding and production.
While 3D printing the characters will certainly assist in refining the designs
and story of the show, in the world of children's TV, the show
is not the only thing that needs to be produced. Effective merchandising
makes the marketing of the show easier and more profitable which keeps it on
the air for longer. Newspaper strip characters had merchandising tie-ins
from their beginning in 1895 and Walt Disney was the first to make
merchandising deals for animation in 1929. Disney
historians Robert Heide and John Gilman wrote, "Disney realized that the
future of the studio could become secure only if enough revenue was generated
by the character merchandising division." (Hollis, 2015) Virtually every animation studio has followed his example and
merchandising tie-ins now bring in the lion's share of profits for each
production. In fact, a familiar pattern
began to develop: with each new medium that a character appeared in, product
availability surged which fueled viewer interest in the program which fueled
interest in the product. (Hollis, 2015) It is estimated that the total economic impact of 3D printing technology
will be $US230-$550 billion per year by 2025, $US100-$300 billion of which will
be direct consumer products such as toys. (Borison, 2014)
Pez dispensers have been a popular
merchandising tie-in for over 60 years.
In the past, toy prototypes would have been hand
sculpted in clay with molds taken to mass produce millions of plastic
figures. The work would have been
laborious and time consuming. With the
advent of 3D printing, contemporary entertainment companies can disrupt the
traditional process of manufacturing toys by developing the products themselves. Blizzard Entertainment, makers of the wildly
successful World of Warcraft and Overwatch video game titles, use Happy Worker
to 3D print prototypes of their toys (Happy Worker, 2017), Activision's
Skylanders model makers have 3D printers in their offices (Clarke,
2017), and McDonald's excited the industry in 2013 by theorizing that
they could have 3D printers in every store to print out the Happy Meal toy each
child wanted on demand. Only the safety of heated plastics in a food
preparation site stopped them from moving forward at the time, but technology
will catch up with this idea (Plafke, 2013).
Blizzard
Entertainment: toys from their Cute but Deadly Series I
The
aims of this research project are as follows: characters from the show will be
sculpted in Maya, refined in Zbrush, and printed in 3D. They will be
produced in a series of poses and analyzed for their likeability,
collectability, and functionality; their profitability in both the collector's
and toy markets will also be assessed and the ensuing range of figurines will
be used in the marketing of the series to potential stakeholders and funding
bodies. Using
base designs, the characters will be translated into one and multi-piece
jointed styles: bobble head, Pez dispenser, bubble bath container, and posed
collectible are just a few of the forms they may take. Final versions will be painted and packaged
to be used as promotional material as the show is shopped around. The opportunity to realize my characters as
toys will be an invaluable part of the development and marketing of my show.
Concept art from the children’s TV show
I am developing
References
Borison, R. (2014, September 3). All The Ways Your
Kids Can Now Customise Their Toys. Retrieved from Business Insider
Australia:
https://www.businessinsider.com.au/3d-printing-toys-2014-8?r=US&IR=T
Clarke, W. (2017, January 27). How They Make
Skylanders, Disney Infiniti, and Shovel Knight. Retrieved from Polygon:
http://www.polygon.com/features/2016/1/27/10811024/manufacturing-skylanders-disney-infinity-shovel-knight
Happy Worker. (2017). Toy Design & Prototyping.
Retrieved from Happy Worker: http://www.happyworker.com/toy-design-prototyping
Hollis, T. (2015). Toons in Toyland : The Story of
Cartoon Character Merchandise. Jackson, US: University Press of
Mississippi. Retrieved from http://www.ebrary.com
Lipson, H. &. (2013). Fabricated: The New World
of 3D Printing. Somerset: John Wiley & Sons, Inc. Retrieved from
http://www.ebrary.com
Plafke, J. (2013, November 9). McDonald’s wants a
3D printer in every restaurant so they can print Happy Meal toys. Retrieved
from www.geek.com: http://www.geek.com/gadgets/mcdonalds-wants-a-3d-printer-in-every-restaurant-so-they-can-print-happy-meal-toys-1576582/
what's the diff between toy and action figure: first is for play, second is for display. statues? Funko?
is printing molds a thing? Or does that have to be made separately from a positive print? Before turning paper in, check that the following things have definitely been addressed!
We've done something that's astounding... we’re really, really happy. People are saying this is the coolest thing they've ever done. Think this represents how awesome Happy Worker is.
Jason Bischoff, Licensing Manager Blizzard Entertainment
http://www.aniwaa.com/3d-printing-for-toys/
Offering a better customer experience
3D printing can also be used to improve the consumer experience.
McDonald’s for example, announced two years ago, considering the idea of 3D printing the Happy Meals toys directly from its restaurants. Children would only have to choose their toys, customize and print them in 3D. It is an opportunity to improve the customer experience in restaurant during the preparation of the meals.
Much ink has flowed since this interview of Mark Fabes, IT Director of McDonald’s UK, however, since then, nothing has been launched yet. Indeed, Mark Fabes said that “this was only an idea”. Still, this ‘idea’ reveals the potential that brands see in 3D printing to improve the experience of their customers.
http://www.theglobeandmail.com/report-on-business/small-business/sb-managing/how-to-create-a-product-prodotype/article17827023/ No! This is from 1996 and now about 3D printing at all http://www.polygon.com/features/2016/1/27/10811024/manufacturing-skylanders-disney-infinity-shovel-knight
Like Skylanders, Disney Infinity is a "vertical toys" business, which means the toys are designed, developed and manufactured internally, which is different from Disney's typical toy development process. Most Disney toys are licensed to other companies for manufacturing, like Hasbro, Mattel or LEGO, and those companies then make products based on Disney's specifications.
Yoda from Disney Infinity
"Five years ago, you were just a video game developer, and now you're worrying about all these different types of things," Vignocchi says.
Disney Interactive even brought in some toy people from its Consumer Products division for a few months, teaching the game people the process of making toys. One of the recommendations they made: In order to crank out figures quicker, make them 2 inches tall instead of the 6 inches Pixar had initially suggested.
McKinsey estimates the total economic impact of 3D printing technology will be $US230-$550 billion per year by 2025, $US100-$300 billion of which will be direct consumer products such as toys.


 IT'S A TABLETOP VACUUFORM MACHINE! I CAN'T BELIEVE IT!


 This was a really good shot by shot look at how this toymaker makers the figures. He's working with wood, but I greatly appreciate the blue foam sculptures (above) as that's what we used to make in puppetry class at Uconn. If I used this for my process, I could easily coat them with a polyurethane or mod podge to seal the holes and make silicon molds.I wonder if I can get an internship with laser cutter lady on Tay St. and learn how her machines and pipeline work.

 The production description implies that this has been 3D printed all in one go with no painting. If so, intriguing.


 Toy packaging designs


 This is making me want to go back into costume crafts and work for Shakespearean festivals again. Maybe I learn the 3D arts, then combine it with Marvelous Designer, and then go work for movies/rich people who will pay me well for it?


/cdn0.vox-cdn.com/uploads/chorus_asset/file/5924327/Yoda.0.jpg)